

Cattle manure is a good basic fertiliser. It helps maintain the organic status of the soil and adds a host of nutrients.
Land preparation for capsicums should not be too intensive. The more the soil is worked, the quicker the structure is broken down.
Preparation should be limited to what is necessary in order to incorporate the fertiliser and have a plantable surface. It might look professional and neat to pulverise the surface, but this method is highly destructive to the soil, especially in areas where it rains heavily.
The value of raised beds
Depending on the area and climatic conditions, consider planting on raised beds. This ensures better air movement in the root zone, which can be important where Phytophthora capsiciis is a possible threat. If this pathogen is present, it can take control after steady, soaking rain. Having raised beds will give you a better chance under these circumstances, but of course there’s no guarantee that it will protect the plants during periods of extended heavy rain.
If you’re using a weedkiller, add a pyrethroid or other similar product to the tank mixture to eliminate the danger of cutworm. In my experience, farmers who have done this as a matter of course have always found the cost and effort well worth it.
Successful transplanting
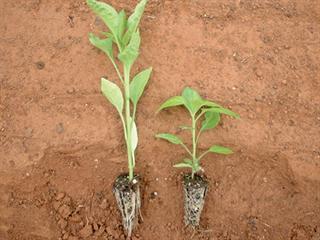
Make sure the seedlings are moist at transplant. Even if the plants have not wilted, the hair roots on the outside of the plugs should not be allowed to dry. The soil should also be moist – not wet – and the seedlings planted as soon as possible after being placed in position in the land.
Post-planting irrigation depends on the size, condition and ‘hardness’ of the transplants. Taller transplants should be set deeper in the soil and will need irrigation more frequently than vigorously growing shorter transplants. Irrigation at this stage should be shallow, just sufficient to wet the root zone.
Frequency will also depend on the weather. Until roots grow out of the medium in the plug, the plants will be dependent on the moisture contained in the medium, as little or no moisture will pass through the soil into the medium.
Poor water quality
Having said this, I have come across quite a few instances where the transplants died despite frequent light irrigation. In these cases, though, the quality of the irrigation water was at fault – usually borehole water with a high sodium content or polluted river water. White crystals appear on the leaves and the plants wither and die. If this happens, irrigate at night or in the early morning when dew is still present.
Drip irrigation works well on this crop. If you’re using one dripper line for two rows, move the line and wet one row and then the other as required until the root systems are developed enough to allow the line to remain between the rows.
Correct application of nitrogen
Once the plants start to produce new leaves, it is time to provide the first nitrogen side-dressing. As the root system is still immature at this stage, run the LAN down the rows, close to the plants but not touching them. If you are fertilising through the drippers, move the dripper line from row to row as before, so that the nitrogen becomes available to the plants.


