

Everyone who enjoys cowboy films will recognise the jingle of a large pair of spurs as the hero walks into the local saloon. But many non-western riders flinch at the idea of using such barbaric instruments on a horse.
However, in western riding, due to the shape of the saddle, the leg is in an entirely different position to that of a hunt seat – and so a special kind of spur is needed.This is not to say that the overuse of spurs is condoned. The show rules for all western disciplines state that any competitor whose horse has marks on its flanks, indicating over-spurring, will be disqualified.
Easy does it
Many western riders in South Africa feel obliged to wear spurs as part of their regular show gear, but have no idea about the type of spurs required for different uses and disciplines. Spurs are known as an artificial aid, as opposed to your hands and legs, which are natural aids.
When you wear spurs, they shouldn’t be in contact with your horse’s sides until you move your heel inwards, so they lightly touch its hide. The lighter the touch and release, the more refined your horse’s response should be.
“A horse can feel a fly landing on it and swishes its tail – no aid you give a reining horse needs to be any stronger than a fly landing,” explains Shane Borland, who will represent South Africa at the World Equestrian Games in Kentucky later this year.
Anatomy of a spur
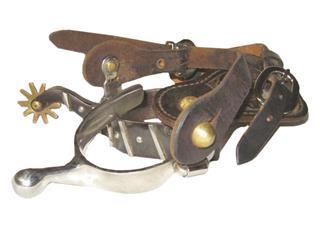
There are three parts to a Western spur. The first is the band – the piece of flattened metal that fits around the back of your boot. Narrow bands are lighter and more comfortable, while wide bands protect your heels from bruising as the weight is more evenly distributed.Attached to the band is the shank – the part that projects backwards. Shanks should be between 7cm and 8cm in length for adult riders.
The shank can be flat, round or twisted, and varies in length and angle.The angle determines how much you have to move your toes out before the spur touches the horse.For disciplines such as horsemanship (the Western equivalent of equitation) and western pleasure, the aids should be almost invisible. Long-shank spurs are commonly used.On the end of the shank is the “rowel”, a flat disc that can vary in diameter from 2cm to 8cm.
Most rowels have between six and 24 spokes, which can be rounded, flattened or pointed.Pointed rowels are the most painful for a horse and easily leave hairless marks or small wounds. A sensitive horse often won’t tolerate them and will buck or swerve when they’re applied. Most riders prefer flattened rowels with blunt edges.
Wearing spurs
Overlarge spurs are known as the buckaroo style and trace back to the ranches and rodeos of the traditional Wild West. They are less barbaric than they appear, but aren’t really suitable for the show-ring. A more popular design is the “ball spur”, where the shank terminates in a solid sphere instead of a rowel.These are particularly useful for novice riders who can spur a horse accidentally if they lose their balance or move their legs too much.
The spur is affixed to your boot by a nylon or leather spur strap. This attaches to buttons on each side of the band. When you put on the spurs, the buckle on the strap is tightened until it’s just comfortable.To stabilise the spur, you can loop a piece of elastic under your instep, hitching it onto the button on each side of the band. To make these tie-downs look neat, attach them underneath the spur straps.
Using spurs correctly
The first step is selecting the ideal pair of spurs. To make sure they fit your riding boots, take your boots along and try the spurs on before you buy them. When riding, spurs shouldn’t slip or rotate, as this can spook your horse.The aid is given using spur pressure.This is a single touch or a series of small taps, never jabs or continuous pushing against the flanks. In western riding, there are three places to apply the spur, each giving a different signal.
The first is called “on the cinch”, where you spur merely by turning your heel inwards.This moves the forequarters over and is used for spins and rollbacks. The second position is a few centimetres further back and encourages your horse to move sideways. The third position is even further back and is used to move the quarters across when initiating a canter, or for turns on the forehand. It’s illegal to spur a horse in front of the cinch.


