

Eggs provide an affordable source of high-quality protein and vitamins. You can provide plenty of eggs for your family by keeping just nine hens, and you may even be able to make a bit of money on the side.
Each hen will lay up to six eggs a week, so nine hens will lay a total of eight or nine eggs a day. You will need to sell about four eggs a day to pay for the feed of the hens. The remaining eggs can be used for household consumption.
Using a cage
It saves time and effort to keep layer hens in a cage. You can either buy a cage or make one yourself (see illustrations). The advantages of a cage are:
- The small space makes management easier.
- The eggs stay clean and are less likely to break. They can also be collected easily.
- It’s easy to keep the cage clean, as the manure falls through the mesh floor.
- There is little or no wastage of feed, and you can easily see when the drinking water is finished.
- You will be able to keep accurate records.
- The cage should be suspended above the ground to ensure that the manure falls through. To do this, place the cage on poles or bricks, attach it to the wall of your house, hut or shed, or hang it from ropes tied to poles.
- Protect it from the sun and rain by placing it under an overhang or roof (such as thatch).
Buy the right hens
The best hens to buy are point-of-lay pullets (18 to 19 weeks old). Buy the birds from a reliable producer, and ensure they are fully vaccinated against all major poultry diseases.
The first (pullet) eggs will be small, but after about two months the eggs gradually increase in size. The number of eggs laid peaks halfway through the year, then starts dropping.
Keep the hens for one year, then sell them as cull hens. If the feed is very cheap, you can keep the hens for up to two years. Hens that are kept for longer gradually lay fewer eggs until they stop altogether. However, the birds will consume the same amount of food, so your profits will decrease until your enterprise becomes uneconomical.
Order new pullets at least four months before selling the hens for slaughter. The money made from the old hens will pay for the new ones.
The best feed
To lay good eggs, hens must be given the best possible feed. This should contain plenty of calcium so that the eggs have hard shells. Buy a good commercial feed such as laying mash/pellets; this is formulated to provide all the nutrients the hens need in the correct quantities. Make sure that feed is available in the trough at all times, and that there is plenty of cool, fresh water in the bottles. To prevent wastage, don’t overfill the trough.
Each hen will consume 120g to 150g of feed a day (inevitably, some will land on the floor and be wasted). One 50kg-bag of feed should last about one month, so buy enough feed (two months’ supply) before the hens arrive.
To make sure the hens adapt quickly to their new home, give them Stresspac in their drinking water when they arrive.
If there’s a sudden serious outbreak of a poultry disease, such as Newcastle disease, in your area, vaccinate all your hens against the disease immediately.
If the hens become infested with lice, treat them with Karbadust powder.
Keep wild birds away from the hens and their feed to prevent the spread of any disease to the hens.
Enough light
For the hens to lay as many eggs as possible, they must have 16 hours of light every day. If you have electricity, switch the lights on before sunrise and let them stay on for some hours after sunset. To maximise egg production without electricity, place your cage outside so that the hens can make use of natural light. Don’t put the cage in direct sunlight; the birds will get too hot and die.
With 16 hours of light a day, each hen will lay about 280 eggs in a year. Without extra light, they will lay about 200 eggs.
Make your own cage
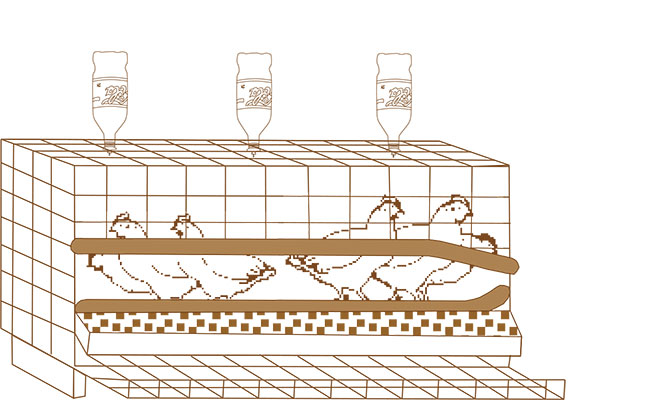
A cage suitable for nine hens must be at least 120cm long by 70cm wide and 45cm high. This will give the birds enough space for limited movement, and enable them to all use the feed trough at the same time.
To make your own cage like the one shown above, you will need galvanised welded mesh (25mm x 50mm pattern); a temporary frame of wood, cane or metal; three 2ℓ plastic soft drink bottles; a hosepipe (old or damaged is fine, as long as it is smooth); three drinking nipples; and a piece of plastic guttering.
Begin by making a simple frame of the dimensions mentioned above. This will make it easier for you to bend the wire mesh into the correct shape as shown in the diagrams.
1: Cut a section of mesh 180cm x 120cm in size and bend it until flat.
2: Attach the mesh to the frame with pieces of wire and secure tightly.
3: Bend the mesh around the frame. Use a hammer to flatten the mesh and keep the edges and corners flat and sharp.
4: Separate the mesh from the frame after cutting the binding wires.
5: Measure and cut four sections of mesh, each of 55cm x 45cm. (Two are for the end-panels, and two for the inside.) Cut every second wire tip off all four panels.
6: Cut three corners off each of the two inside panels.
7: Use a pair of pliers to fasten the two inside panels to form three equal compartments.
8: Fasten the two outside panels.
Neaten, cut off or bend all sharp points or edges.
9: For the feeders, use a hacksaw to cut a 140cm section of guttering. Mark off 10cm at each end and cut along the bends. Fold each piece inwards. Flatten with a hammer and a pair of pliers and remove/bend in sharp edges. Make a small hole on each end for securing the feeder to the cage with wire.
10: For the drinkers, punch holes in each bottle cap using a nail and hammer; do not remove the plastic inner lining. Use a hand drill to enlarge the holes so the nipple fits tightly. Screw in the nipple. Punch a small hole in the bottom of the bottle to allow the air to flow in. Screw the cap, turn the bottle upside down and attach the bottles to the cage in the centre of each compartment. Using a pair of pliers, bend the mesh slightly so that the the bottle top fits in snugly. To fill, unscrew the cap of the bottle and fill with water, using your finger to block the small air hole.
Hosepipe protection
The hosepipe can offer the birds some protection (see diagram above). Cut two 120cm lengths of hosepipe.
Slit them open along their length. Fit one over the back edge of the gutter and the other over the top of the cage opening.
Secure them with wire or cable ties. Cut off the sharp ends of the ties or wire and bend them away from the hens’ necks.
Your cage is now ready. When putting it into position, slant it slightly forward so that the eggs can roll down the slope gently into the egg tray. Test this before securing the cage.
Source: ‘Small-scale egg production’.


