

Groundnut production can hold many benefits for smallholder farmers, especially when included in a crop rotation programme. These benefits include enhancing the nitrogen content of the soil.
Groundnuts do best in warm regions, where the minimum air temperature does not fall below 15°C during the growing season. The optimal air temperature for production of the crop is between 24°C and 32°C. Dryland production requires an annual rainfall of between 450mm and 600mm for a good yield. Any type of irrigation will benefit the crop.
Groundnuts grow best in sandy soil with less than 15% clay. The best time to plant is from early November to no later than 25 November. Planting after this will result in a significant drop in yield, as the growing season will be too short for the plants to mature properly.
Soil preparation
Prepare the land, and particularly the seedbed, thoroughly, ploughing or digging the soil and removing weeds. No plant residue should be left on the ground, as this can harbour diseases that may cause the crop to fail. The seedbed should be fine and level to ensure even germination as well as even maturing of the crop.
Planting
Use certified groundnut seed; its germination has been evaluated and its quality can be relied on.
Before planting, coat the seed with tetramethylenedisulphotetramine (TMDT) or a similar compound, taking great care to follow the instructions on the label. This treatment will ensure that the seed do not rot when attacked by fungi in the soil.
Plant the seed in damp soil, as this will speed up germination. When planting by hand, use the point of a rake to make a furrow no deeper than a matchbox placed on its side (between 3cm and 5cm).
The rows should be 90cm apart; this will ensure that the groundnuts can absorb water easily from the soil and make it easier to control weeds.
Once the seed has been placed in the furrow, use a rake to close the furrow gently, keeping the seedbed even. Avoid making ridges on top of the row; this will bury the seed too deeply in the soil (‘earthing-up’), and may result in a yield loss of up to 50%.
To reduce competition from weeds, apply pre-emergence herbicide registered for use on groundnuts. If you cannot afford herbicide, hoe the weeds that emerge between the planted rows as often as possible. Be careful not to hoe too close to the groundnut plants, as this may injure them and cause yield loss.
Groundnuts take one to two weeks to germinate, and the plant will form a well-developed root system in the first few weeks.
Between 38 and 45 days after planting, the plant will start to flower; this is the time to apply gypsum.
Gypsum is a source of calcium, magnesium and sulphur, which are elements essential for producing high-quality groundnuts.
If you have a small plot, apply the gypsum by hand, scattering it over the plants. The rate of application should be about 1kg/m2 (100kg for a 10m x 10m land). This will not harm the groundnuts.
The flowers bloom for only a day. After approximately a week, a small ‘peg’ appears where each flower was attached to the plant; at the tip of this peg is the embryo.
The peg grows downwards and buries the embryo in the soil; this becomes the groundnut pod filled with seed (the kernels).
Diseases
Scout the land regularly, and look for any signs of disease on the leaves. The leaves are the ‘factory’ of the plant and you therefore need to keep the leaf canopy healthy.
Early and late leaf spot can result in leaves dying and dropping off. This causes the pods to stop forming and leads to yield loss. Leaf diseases such as web blotch and botrytis cause a decrease in the quality of the crop as well as a drastic fall in yield.
Should you notice any of these diseases, start a spray programme with fungicides registered for use on groundnuts. If you don’t act in time, your crop is likely to fail.
Harvesting
Groundnut plants mature as the season draws to a close around the end of March or the beginning of April. To assess the maturity of the crop, choose between five and 10 plants at random and lift them from the soil. Leave them in the shade for a day to enable the kernels within the pods to shrink a little and make them easier to shell.
Remove all the kernels, gather the shells together, and look inside them. As a groundnut pod matures, the inner surface of the shell begins to show a brownish/blackish discolouration. If 75% of the inner shells of your sample show these darker colours, you can start lifting the crop.
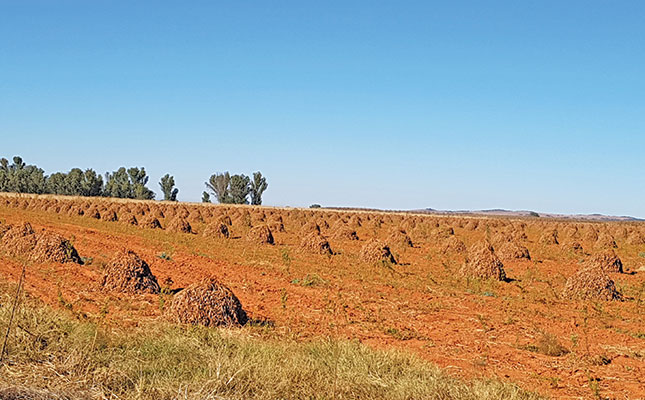
Lifting groundnuts can be done either by using a tractor-drawn implement in the form of a blade that cuts the roots below the soil, or simply by using a garden fork. Once lifted, the groundnut plants should be stacked and left to dry for four to six weeks.
Once the pods have dried, pick them from the plant by hand or rub the pods against a grid of some sort (wire mesh with fairly large openings, for example) to remove them from the plants. The harvested pods can now be bagged and transported to a processor or sold on the informal market.
Producing groundnuts requires considerable labour, but can earn a reasonable profit. To ensure a high yield and good quality, do your best to gain as much knowledge as you can about groundnut production well before planting!
Email Loureine Muller at [email protected].


